MiniGoogle.tk

Showing posts with label installation. Show all posts

Thursday, November 4, 2010

How to Setting Up the new Valet Connector

The Cisco Valet Connector helps you connect your computer to a Valet wireless network or any other wireless network for quick Internet access. Installing the Cisco Valet Connector is fairly easy. Just follow the steps below in setting up your Valet Connector on your computer or laptop.Minimum sysem requirements
- A Computer with 1 GHz or faster processor.
- 512 MB or more RAM.
- An Available USB port.
NOTE: The Valet Connector (AM10) is supported for Windows 7, Vista SP1 and XP SP3 but NOT for Mac.
Step 1:
Connect the Valet Connector to a USB port on your computer or laptop.

Alternatively, you can also use the USB Extension Base to connect the Valet Connector. Plug the Valet Connector into the USB Extension Base and connect the Base to a USB port on your computer or laptop.
Step 2:
Click Set up your Cisco Valet Connector. Proceed to Step 4.
If you do not see this, click Open folder to view files.

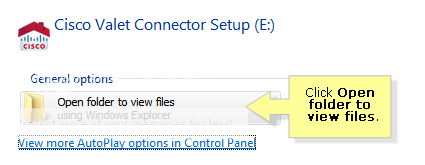
NOTE: For ease of use, the Valet Connector comes preloaded with its installation software. The installation files are stored on the Valet Connector's built in flash storage. However, once Cisco Connect has been successfully installed, this storage facility will no longer be accessible.
Step 3:
Double-click the setup screen as seen in the below image.


NOTE: For Windows XP, the file may be known as Setup.exe. You are not advised to delete any of the files within the AM10. The adapter is not recommended to be used as a USB flash drive.
Step 4:
Read the License Agreement and click Next.


The following screen appears. Wait a few moments while the setup software is setting up your Valet Connector.


Step 6:
If you have an Easy Setup key, select Yes, I have an Easy Setup Key and click Next. Proceed to Step 9.
Otherwise, select No, I don't have an Easy Setup Key and click Next. Proceed to Step 7.


Step 7:
Select your wireless network and click Next.


Step 8:
If prompted, enter the wireless password for your network. Proceed to Step 10.


Step 9:
Follow the on-screen instructions. Click Next once you have completed the on-screen instructions.


Step 10:
The installation is complete when you see the following screen. Click OK.


Step 11:
You are directed to the Cisco Connect screen. Click Close to exit.

Saturday, October 23, 2010

Router Recover from a bad flash or Dead like wrt54g, wrt54gl ...

Recover back your Routers like wrt54g, wrt54gl and many other Router
So, you're afraid you've bricked your router. Don't worry, there are a number of things you can try to get your router working again before giving up and living with the fact that your router is now a paperweight.

It is also unfortunately possible to configure your router in ways which make it dead to the world. These techniques may be useful in these cases also.

Before you continue below, make sure you've first tried a hard reset to revive your router:


1.Disconnect the router from UTP cables (not the power cable).

2.Push reset button for 30 secs.

3.Without releasing reset button, disconnect power cord.

4.Hold the reset button for another 30 secs.

5.Replug the power cord.

6.Still hold the reset button for another 30 secs.

7.Release the reset button and give the router about 10 secs to resettle.

8.Disconnect power cord for another 10 secs and then reconnect.

9.All should be in default settings now.

This procedure is usually called 30/30/30 reset.


If the power light blinks in a neverending way, the 30/30/30 reset has no effect. Go to the Windows section of this page to see the reset-from-scratch procedure

For more help in detail  visit my other blog  and  http://www.dd-wrt.com/wiki/index.php/Recover_from_a_Bad_Flash