MiniGoogle.tk

Showing posts with label Setting. Show all posts

Friday, February 25, 2011

How to Setting Up A Linksys Admin Router

If you have just purchased a Linksys wireless router, you will need to fully install it into your home or your place of business before you can begin to network or use it. One of the things you will need to do when installing your router is to enter your Linksys Admin codes. Because you need to ensure your overall security with your device, it is important that you find this code and keep it in a secure place.


What Is It?


The Linksys admin is a code that allows you to get into your administrator account. This account should be maintained by the person or people who will be responsible for keeping the network working properly. In most situations, it is rarely needed besides the first time, when you set up your network.


At that time, you be prompted to log into the router as the administrator. In most situations, you will have the default administrator code in place at this time, as long as you purchased the unit new and from the company directly. It will have a user name as well as a password that are set at the factory that the router was made at.


The default login for the Linksys wireless router, either the Linksys wireless broadband router or the DSL router will be specific to the make and model.
* If you have the Linksys EtherFast Cable/DSL Ethernet router, the admin will simply be Administrator.


* If you have the Linksys BEFW11S4 or the Linksys WRT54G, then the code will simply be admin. These two do not have any password associated with them when they are new.


* If you have the Linksys Comcast routers, then the admin user name will be Comcast and the password for this router will be 1234.


However, if you have a different make or model than is listed here, you will need to use the information provided to you when you purchased the device. You can call customer service if you have forgotten this information.
Once you have physically installed the Linksys wireless router into your computer and Internet connection, you will need to enter the Linksys admin information into the system. Then, you will be taken through a setup process that allows you to choose which devices in the home or office you wish to link together in your network. If you decide to, you can change the user name and password if you would like. However, this is not required.
Written by one of the foremost experts in web application security - Robert Hansen - who has spoken at the Pentagon and works with many of the Fortune 500. 50% commission, 300+ pages of extremely high quality content on digital loss prevention.


Check it out!

Thursday, November 4, 2010

How to Setting Up the new Valet Connector

The Cisco Valet Connector helps you connect your computer to a Valet wireless network or any other wireless network for quick Internet access. Installing the Cisco Valet Connector is fairly easy. Just follow the steps below in setting up your Valet Connector on your computer or laptop.Minimum sysem requirements
- A Computer with 1 GHz or faster processor.
- 512 MB or more RAM.
- An Available USB port.
NOTE: The Valet Connector (AM10) is supported for Windows 7, Vista SP1 and XP SP3 but NOT for Mac.
Step 1:
Connect the Valet Connector to a USB port on your computer or laptop.

Alternatively, you can also use the USB Extension Base to connect the Valet Connector. Plug the Valet Connector into the USB Extension Base and connect the Base to a USB port on your computer or laptop.
Step 2:
Click Set up your Cisco Valet Connector. Proceed to Step 4.
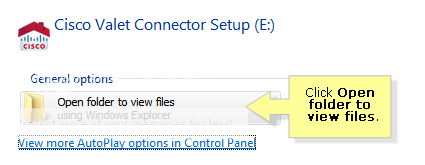
If you do not see this, click Open folder to view files.

NOTE: For ease of use, the Valet Connector comes preloaded with its installation software. The installation files are stored on the Valet Connector's built in flash storage. However, once Cisco Connect has been successfully installed, this storage facility will no longer be accessible.
Step 3:
Double-click the setup screen as seen in the below image.


NOTE: For Windows XP, the file may be known as Setup.exe. You are not advised to delete any of the files within the AM10. The adapter is not recommended to be used as a USB flash drive.
Step 4:
Read the License Agreement and click Next.


The following screen appears. Wait a few moments while the setup software is setting up your Valet Connector.


Step 6:
If you have an Easy Setup key, select Yes, I have an Easy Setup Key and click Next. Proceed to Step 9.
Otherwise, select No, I don't have an Easy Setup Key and click Next. Proceed to Step 7.


Step 7:
Select your wireless network and click Next.


Step 8:
If prompted, enter the wireless password for your network. Proceed to Step 10.


Step 9:
Follow the on-screen instructions. Click Next once you have completed the on-screen instructions.


Step 10:
The installation is complete when you see the following screen. Click OK.


Step 11:
You are directed to the Cisco Connect screen. Click Close to exit.